久々にネタができたのでmemoを。
先日、予約していたiPad WiFi 16GBモデルが家に届いてから、ずっとこれで遊んでいる。やはりちょっと重いけど、画面が大きいというのは全然違う。
そんなiPadでSuperColliderが動くのかどうか試してみることに。まず、SDKは3.2のものが必要なので、最新版をインストールしておく。その後に、ターミナルでsvnを使って最新版ソースコードをcheckout。
svn co https://supercollider.svn.sourceforge.net/svnroot/supercollider/trunk SuperCollider3
現時点でのリビジョンは 10138。
A SuperCollider3/windows/sc3-win-installer-template.wxs
A SuperCollider3/windows/Win32Tests.sc
A SuperCollider3/windows/distrowin.py
A SuperCollider3/windows/WindowsReleaseHowTo.txt
A SuperCollider3/windows/compat_stuff
A SuperCollider3/windows/compat_stuff/getopt.c
A SuperCollider3/windows/compat_stuff/WSA-pthread-compat-stuff.cpp
A SuperCollider3/windows/compat_stuff/getopt.h
A SuperCollider3/windows/compat_stuff/stdbool.h
A SuperCollider3/windows/scsynth.vcproj
A SuperCollider3/README LINUX
U SuperCollider3
Checked out revision 10138.
iPhone/iPad関係のファイルは、以前と同じように「iphone」フォルダの中に収められている。
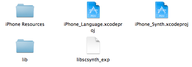
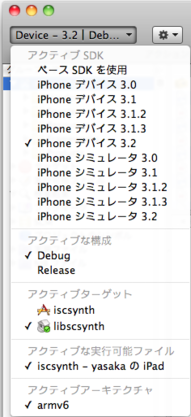
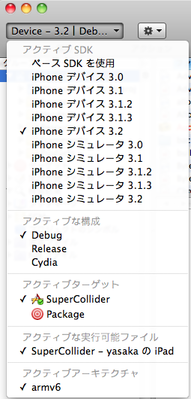
まずは、「iPhone_Synth.xcodeproj」を開く。開いたら、プロジェクトウィンドウの左上の「概要」ポップアップメニューから以下の項目を選択する。
・アクティブSDKを「iPhone Device 3.2」
・アクティブターゲットを「libscsynth」
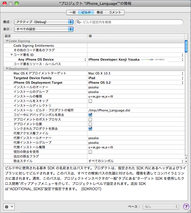
続いて、「プロジェクト」メニューから「プロジェクト設定を編集」を選んで設定画面を開く。

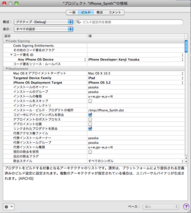
コードサイニングの中の「コード署名ID」で自分のIDを選んでから、以下の設定を変更する。
・DeploymentのTarget Device Familyを「iPad」
・DeploymentのiPhone OS Deployment Targetを「iPhone OS 3.2」
・アーキテクチャのベースSDKを「iPhone デバイス 3.2」

設定ができたら設定画面を閉じて「ビルド」メニューから「ビルド」を実行する。手元では警告が11ほど出たが、このままで問題ない。

続いて、「iPhone_Language.xcodeproj」を開く。
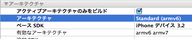
まずは、先ほどの「iPhone_Synth.xcodeproj」の設定と同じように、左上の「概要」ポップアップメニューから以下の項目を選択する。
・アクティブSDKを「iPhone Device 3.2」
・アクティブターゲットを「SuperCollider」
続いて、「プロジェクト」メニューから「プロジェクト設定を編集」を選んで設定画面を開く。
先ほどと同じように、コードサイニングの中の「コード署名ID」で自分のIDを選んでから、以下の設定を変更する。
・DeploymentのTarget Device Familyを「iPad」
・DeploymentのiPhone OS Deployment Targetを「iPhone OS 3.2」
・アーキテクチャのベースSDKを「iPhone デバイス 3.2」
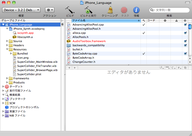
設定ができたら設定画面を閉じて、「グループとファイル」の中の「Resources」を展開する。
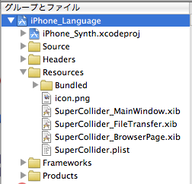
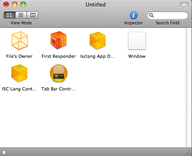
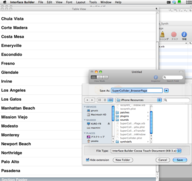
「Resources」の中にある「SuperCollider_MainWindow.xib」をダブルクリックする。すると、Interface Builderが立ち上がり、iPhoneサイズの「Tab Bar Controller」ウィンドウが表示される。ここで、「File」メニューから「Create iPad Version Using Autosizing Masks」を選ぶ。
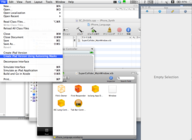
すると、iPadサイズの「Tab Bar Controller」ウィンドウが表示され、「Untitled」というプロジェクトウィンドウが作られる。

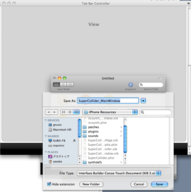
「Untitled」のウィンドウを最前面に持ってきて、「File」メニューから「Save」を選択する。保存する際には、ソースコードの「iphone」フォルダの中の「iPhone Resources」フォルダの中に「SuperCollider_MainWindow.xib」として保存する。
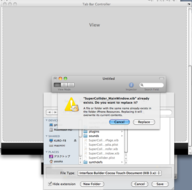
上書き保存(Replace)するかどうか聞かれるので、「Replace」ボタンをクリックして保存する。
保存できたらウィンドウを全て閉じる。
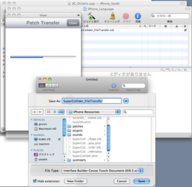
Xcodeに戻って、先ほどの「グループとファイル」の中の「Resources」には他に「SuperCollider_FileTransfer.xib」と「SuperCollider_BrowserPage.xib」というファイルがあるので、これも同様にそれぞれ開いて、「Create iPad Version Using Autosizing Masks」でiPad番のものを生成し、それぞれ同じファイル名で保存する。
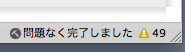
Interface Builderのファイルを変更できたら、ビルドを実行する。いくつか警告が表示されるが問題なく完了する。
あとは、アプリをXcodeのオーガナイザを使って自分のiPadに転送する。「グループとファイル」の中の「Products」の中を展開すると「SuperCollider.app」というファイルがあるので、これをDragしてオーガナイザのiPadの項目にDropする。

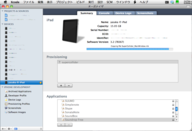
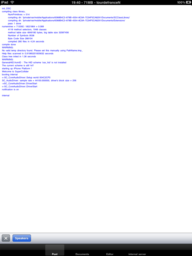
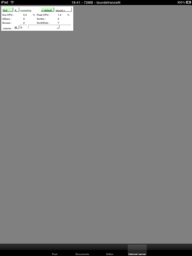
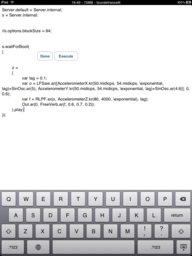
転送が完了したら、早速iPadで起動してみる。特にエディタ画面が、画面が広くなった+iPadのまともなキーボードで入力できる、ということで使い物になるレベルになったのではないかなぁ、と。